No products in the cart.


Electronic Parts, Development Board, ESPRESSIF(ESP)

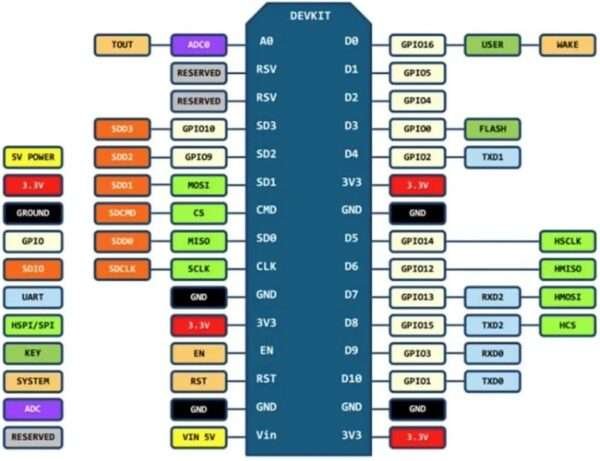
ESP8266 Development Board (CP2102, Type C)
Availability:
In stock
- Open-source, Interactive, Programmable, Low cost, Simple, Smart, WI-FI enabled
- Arduino-like hardware IO
- Integrated TR switch, balun, LNA, power amplifier and matching network
- Integrated PLL, regulators, DCXO and power management units
- Onboard USB to serial chip to easily program and upload codes from the Arduino IDE
- Embeds logic level converter circuits
- Has onboard 3.3V regulator to ensure enough power to function as your go-to WiFi chip!
- Easy access to the GPIO pins for easy prototyping
- ESP-12E Processor
- Easy to use breadboard friendly form factor
19,500 Ks
In stock
The NodeMCU ESP8266 development board comes with the ESP-12E module containing the ESP8266 chip having Tensilica Xtensa 32-bit LX106 RISC microprocessor. This microprocessor supports RTOS and operates at 80MHz to 160 MHz adjustable clock frequency. NodeMCU has 128 KB RAM and 4MB of Flash memory to store data and programs. Its high processing power with in-built Wi-Fi / Bluetooth and Deep Sleep Operating features make it ideal for IoT projects.
NodeMCU can be powered using a Micro USB jack and VIN pin (External Supply Pin). It supports UART, SPI, and I2C interface.
Programming NodeMCU ESP8266 with Arduino IDE
The NodeMCU Development Board can be easily programmed with Arduino IDE since it is easy to use.
Programming NodeMCU with the Arduino IDE will hardly take 5-10 minutes. All you need is the Arduino IDE, a USB cable and the NodeMCU board itself.
Uploading your first program
Once Arduino IDE is installed on the computer, connect the board with the computer using the USB cable. Now open the Arduino IDE and choose the correct board by selecting Tools>Boards>NodeMCU1.0 (ESP-12E Module), and choose the correct Port by selecting Tools>Port. To get it started with the NodeMCU board and blink the built-in LED, load the example code by selecting Files>Examples>Basics>Blink. Once the example code is loaded into your IDE, click on the ‘upload’ button given on the top bar. Once the upload is finished, you should see the built-in LED of the board blinking.
Applications
- Prototyping of IoT devices
- Low power battery operated applications
- Network projects
- Projects requiring multiple I/O interfaces with Wi-Fi and Bluetooth functionalities
| Brands |
|---|
Based on 0 reviews
Only logged in customers who have purchased this product may leave a review.
Related products
- Electronic Parts, Module, OLED Display Module
TM1637 Clock Display Module
9 in stock- Ease to use.
- Ease of multiplexing.
- Can use as a 4 digit display unit.
- Can use as a clock display.
- DIY clock project.
- 4 digit display unit.
- Electrical/Electronic projects.
- The counter project using 7 segment display.
- 4 M2 screws positioning holes for easy installation
SKU: EAP-000007 - Electronic Parts, Module, LCD Display Module
20×4 Character LCD Display Module (Blue)
20 in stock- LCD display module with blue backlight
- It can display 4-lines * 20-characters
- Small and light appearance, it is easy and convenient to use
- Suitbale for copiers, fax machines, laser printers, industrial test equipment, networking equipment etc
SKU: EAP-000016 - Detection & Sensor Module, Electronic Parts, Module
Raindrop Detection Sensor Module
111 in stock- The LM393, use of the wide voltage comparator
- Provide both digital and analog output
- Output LED indicator
- Compatible with Arduino
- TTL Compatible
- The sensor uses the high-quality FR – 04 double material, the large area of 5.5*4.0 CM
- Treatment of nickel plating and surface, have fight oxidation, electrical conductivity, and life has more superior performance
- The comparator output, signal clean, good waveform, driving ability is strong, for more than 15mA
- With potentiometer sensitivity adjustment
- The output format: digital switch output (0 and 1) and analog AO voltage output;
- Has a fixed bolt hole, convenient installation
SKU: EAP-000001


There are no reviews yet.